Windows Desktop Hacks - Part 2 - The Desktop Icon Hack. As an organization nut, I like things to be organized and in their place. This includes my Windows desktop icons. Unfortunately, Microsoft Windows does not always cooperate. It seems with every change in screen resolution, reboot, or inadvertent "arrange icons" command, my careful icon placement get's scrambled, never to return until I put them back where I wanted them. Until now...

You may not be able to see it in the screen shot above, but I am able to;
- Arrange my icons along the right and left sides of my desktop (or anywhere I want them for that matter)
- Put them in logical groups - Internet Shortcuts, Frequently Used Applications, Project Folders, Utilities, etc.
- Use small icons rather than the normal large Windows icons.
- ...and most importantly, when they get moved around, restore them to their neatly organized state.
This is all accomplished with a utility called IconLayOut. IconLayOut is a tiny freeware utility. You can download the utility from a guy names Henrik on his webpage at blahblah.se.
The program works great, but the installation can be a little tricky. Follow these steps to get IconlayOut installed and running.
- Download and unzip the file called IconLayOut.zip from the authors download page. Three files will be extracted...
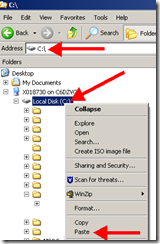
- The only file you need to worry about is IconLayOut.exe. Copy IconLayout.exe to your c:\ (root) directory.
- Next, create 2 shortcut icons on your desktop. One to save your current icons settings. The other to restore your previously saved icons settings.
To create a shortcut, right click on your Windows Desktop and Select New > Shortcut.
The two shortcuts should have these properties;
1 - Location: c:\iconlayout.exe -s
1 - Name: Save Icon Layout
2 - Location: c:\iconlayout.exe -r
2 - Name: Restore Icon Layout - To save the layout of your Desktop icons, click the Save Icon Layout shortcut. To restore a previously saved icon layout, click the Restore Icon Layout shortcut.
I put the Save/Restore Icon Layout shortcuts on the bottom left corner of my desktop.
That's it!
Following are a few more tips and tricks to using IconLayout.
- To restore your icon layout after each reboot, copy the Restore Icon Layout shortcut to your Windows Startup folder.
- When you save your icon layout, it is copied to a file called c:\user-name@machine-name@screen-resolution.txt. To be safe, make a backup copy of this file. A backup has saved me many times!
- To play with different icon sizes, run c:\iconlayout.exe without any parameters. Be sure to make a backup of the previous .txt file I mentioned above.
I hope you find this little freeware utility as handy as I do.


6 comments:
Thanks for this great idea and making the time to add the detailed instructions. How do I copy the Restore Icon Layout to my Start Up Folder with Windows Vista?
Bob, check out this post (starting with step 2) to add something to your Vista Start Up folder.
Thanks,Tim! Great help. I'm up and running.
I think the idea is great ! I had trouble getting it to work as described. I guess I m just not setting it up correctly. Thanks for the article though !
Tim, just an FYI. This can all be done in XP (don't know about the others) through the Display properties.
Right click on the Desktop, click Properties > Appearance > Advanced.
In the Item: box, click on the drop down arrow and then click on Icon.
Then change the Size: from 32 (default) to 16 and Font: size from 8 to 6 or 7. Click OK. On the Properties box, click Apply and then OK.
Now the desktop will have small icons, that you can change back easily, without having to download anything or doing anything else.
Rob
Anonymous, great tip. I had no idea that you could setup the small icons with native XP. Very cool.
The only thing missing is the ability to restore the icon layout after your icon placement gets jazzed up. Any tips?
Post a Comment