Monday, January 19, 2009

Can't View Images in Outlook Email Messages

image A few days ago, a colleague of mine mentioned that he could not see any images sent to him in Outlook e-mail messages.  His e-mails simply displayed a red-X where the image should have been.  I did a quick Google search and found hundreds of possibilities that could have caused this.  Luckily, one search result stood out to me as a possible solution.  The accurate solution to my colleagues woes was posted on itqueries.com.  This fixed the problem of images not being displayed in Outlook e-mail messages.

Here is the solution;

  1. Close Outlook
  2. Load Regedit.  Start | Run | Regedit
  3. Navigate to the following registry key;
    HKEY_CURRENT_USER\Software\Microsoft\Office\11.0\Outlook\
      Security\OutlookSecureTempFolder
  4. Delete the path specified in the OutlookSecureTempFolder key
  5. Restart Outlook

Upon the restart of Outlook, the registry key entry was automatically recreated, and my colleague was able to view images in e-emails.

My theory is that the previous OutlookSecureTempFolder was corrupt or invalid.  By deleting the path to this directory, Outlook recreated a new temp directory and all was well.

If you ever experience the same type of problem, I hope this same tip works for you!

Sunday, January 18, 2009

Adding Recent Comments List to your Blogger Blog

I recently added a new section to the right side of this blog called "Recent Reader Comments".  As the name implies, it is a list of the 10 most recent comments people have left on mygtdstuff.com.

I did not find a standard Google Blogger widget to do this.  I did find quite a few 3rd party Blogger widgets (or "gadgets" as they are now called).  Unfortunately, all of the 3rd party widgets I found require that you run some script on a mystery server.  You have no idea what this script is doing.  You do not get to see the code.  Odds are, these 3rd party scripts are at a minimum adding cookies to your users browser.  Worse yet, these 3rd party scripts could be doing (or adding) something evil to your readers computer.  I'm not willing to take that risk.

Finally, I found a very cool way to add a recent comment list from a site called Hackosphere.  The nice thing about this method is that it works with standard Google Blogger functionality.  The folks from Hackosphere show you the program code that you will need to make it work.  Full disclosure.  No mystery scripts!

Here is how it works;

  1. Sign in to Blogger to Edit your Blog.  Select the Layout tab, the click Edit HTML.
  2. Click the Download Full Template link to save a backup of your Blog Template.
  3. Find the </head> tag in the HTML of your Blog Template
  4. Add the code from this page directly after the </head> tag
  5. Save your Template
  6. Next, click Page Elements then Add a Gadget
  7. Select the HTML/JavaScript Gadget
  8. Add this code to the HTML/JavaScript Gadget:
    <br/><script language="javascript">
    var numcomments = 10;
    var numchars = 100;
    </script>
    <script src="http://yourblog.blogspot.com/feeds/comments/default?
    alt=json-in-script&callback=commentDisplay"></script>
  9. Customize this code as needed:
    - Change the numcomments variable to the number of comments to display
    - Change the numchars variable to the number of characters from each comment to display
    - Change the "yourblog" text to the name of your blogger blog
  10. Click Save.

Thats it.  10 quick and easy steps to a recent comments widget/gadget.  Big thanks for Hackosphere for the code to make this work!

Wednesday, January 14, 2009

Jott to Cancel its Free Service


Starting February 2, 2009 Jott.com will eliminate it's free service.  Albeit limited, I was a big fan of Jott's free service.  Jott Express worked great on my PC, Jott for the iPhone worked "good enough" on my iPod Touch.  According to John Pollard, Jott CEO and Co-founder;

If you’re reading this, you’ve probably heard that we’re ending Jott’s free services (Jott Basic and Jott Notepad for the iPhone). Unfortunately, it’s true, beginning on February 2nd. Plans for current paying customers are not changing.

I know you’ll have questions, so I wanted to get out in front and tell you why we’re doing this. If you already know you want to upgrade, scroll down for instructions (and a nice discount), but either way I hope you’ll read further.

Our #1 priority is to keep Jott a company that innovates on behalf of customers. It’s why Shree and I started the company in early 2006, and it’s a passion shared by everyone who works here.

Whether you are a paid or a free customer, we thank you for all of the support you’ve given us over the past couple of years, and the support you’ll hopefully give us in the future.

More details can be found on the official Jott blog. Is Jott worth the 4 bucks a month for their standard package?  I'm not sure.  I would love to get the Jott for Outlook functionality.  I'm just not sure it's worth the $4 per month.

Got an opinion?  Know of an alternative Jott?  Got a few good reasons why someone should pay for Jott?  Leave a comment and let me know your thoughts!

Saturday, January 10, 2009

Windows Startup Hack

We end this week's series on desktop hacks with a discussion about a tool that will get you to your Windows desktop faster.  This tool is a program called Startup DelayerStartup Delayer is a cool freeware utility that allows you to pace the start time of the applications that run when your PC boots-up.

Normally, when your PC starts, Windows fires up a boat-load of applications all at the same time.  Each application fights for time on your processor, each application fights with your disk controller to access supporting files on your hard drive.  While all this happens, your PC is unusable.  Usually a slow stroll to the coffee machine and back will be enough time for your PC to load all these programs and allow you to access the applications that you wanted when you turned your PC on in the first place.

The truth is, Windows does not necessarily need to have all of these "startup" programs loaded and running before your PC is usable.  In fact, many of the programs that load when your PC boots-up are "nice to have" applications.  Applications that you can live without, or at a minimum, live without for a period of time.

Which brings us to Startup DelayerStartup Delayer looks at all the applications that load at boot-up and allows you to set how fast or slow these programs start up.  For example, I have a logitech mouse.  My mouse comes with a program that allows me to set the function of the mouse buttons.  This program is called SetPoint.  Do I need it immediately after my PC starts up?  No.  Do I need it periodically when using my PC?  Maybe.  With Startup Delayer I can get to my Windows Desktop faster by telling Windows to load SetPoint 3 minutes after my PC starts up.

image

With this set, I can get to my Windows Desktop quicker.  Start surfing the net, editing a document, updating a spreadsheet...  Then 3 minutes later, Startup Delayer will fire up SetPoint for me.  This works with just about any application that Startup Delayer identifies as a Windows Startup Program.

In addition to delaying the startup of certain applications, Startup Delayer allows you to not start certain applications at all.  This is as simple as unchecking a box next to the name of the application.  Quick, easy, effective!

I have been using Startup Delayer for 6 month's now without any problems.  The trick to using Startup Delayer is knowing which applications are needed and which applications can be delayed.  Trial and error is one method, but it takes time and patience.  There are a number of good web site directories with descriptions of Windows startup programs.  My favorite is ProcessLibrary.com.  At ProcessLibrary.com you can enter the name of a startup program and you can find out what it is, what it does and if you really need it.  Quite handy.

If you are tired of waiting for your Windows PC to boot up, Startup Delayer is definitely for you!

Thursday, January 8, 2009

Outlook E-mail Hack - xobni

OK, technically not an Outlook "hack", but in keeping with this weeks' theme, I needed to use the word "hack".  This post is about a relatively new Outlook add-in called xobni (inbox spelled backwards).  xobni is a neat little (currently) freeware application that helps you manage your Outlook e-mail, attachments, contacts and it even reaches out to your favorite social networks.

OutlookSnapshot

As you can see in the picture above, xobni does not take up too much Outlook real-estate.  It sits on the right side of Outlook and is composed of 6 sections.

Note: The text portions of these screen-shots have been blurred to protect the innocent :).

image

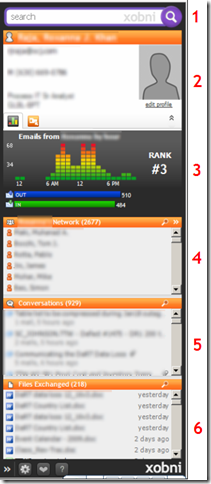
1. The top section is for searching your e-mail.  xobni indexes all of your e-mail and makes for fast searching.  I was quite impressed with how quick xobni performs a search.  I was so impressed, I have opted to not use Microsoft Desktop Search while I evaluate xobni.  So far, so good, I have not missed MS Desktop Search.

2. The second section displays contact information about the sender of the currently selected e-mail.  Name, phone numbers, e-mail address, title, department, and even a picture.  It takes what it finds in the Outlook directory.  If a phone number cannot be found in the Outlook directory, xobni does a real nice job searching e-mails and extracting phone numbers.  Other information can be manually added quickly and easily.  xobni also includes a facility to link to Facebook, Linked-in, Skype or Yahoo Mail to display other information about this person.

3. Section 3 displays some analytics about the e-mail sender.  A neat graph showing when you typically send/receive e-mails from this person, how many e-mails you have incoming and outgoing to this person, and a ranking based on how frequently you communicate with this person.

4. Show's the current senders network.  That is; people that this person includes on the to: or cc: lines of their e-mails.  Not sure I see value in this feature, but I will keep giving it some thought.

5. Conversations.  I find this very useful.  This shows the most recent e-mails between you and the selected sender.  You can scroll through the list and open, reference, or respond to previous e-mail conversations.  Very handy!

6. The last section is a list of the file attachments that have been included in the e-mail conversations between you and the currently selected sender.  Simply click an attachment to open it.

I learned about xobni about a year ago from my buddy Daniel at HackYourDay.  I finally got around to giving it a try and I am sure glad that I did.  I have been using xobni for about 2 weeks now, and I am thinking this is a keeper Outlook hack (add-on). 

If you have experience with xobni leave a comment with your thoughts about it.  Thanks!

Tuesday, January 6, 2009

Desktop Icon Hack

Windows Desktop Hacks - Part 2 - The Desktop Icon Hack.  As an organization nut, I like things to be organized and in their place.  This includes my Windows desktop icons.  Unfortunately, Microsoft Windows does not always cooperate.  It seems with every change in screen resolution, reboot, or inadvertent "arrange icons" command, my careful icon placement get's scrambled, never to return until I put them back where I wanted them.  Until now...

image

You may not be able to see it in the screen shot above, but I am able to;

  • Arrange my icons along the right and left sides of my desktop (or anywhere I want them for that matter)
  • Put them in logical groups - Internet Shortcuts, Frequently Used Applications, Project Folders, Utilities, etc.
  • Use small icons rather than the normal large Windows icons.
  • ...and most importantly, when they get moved around, restore them to their neatly organized state.

This is all accomplished with a utility called IconLayOut.  IconLayOut is a tiny freeware utility.  You can download the utility from a guy names Henrik on his webpage at blahblah.se.

The program works great, but the installation can be a little tricky.  Follow these steps to get IconlayOut installed and running.

  1. Download and unzip the file called IconLayOut.zip from the authors download page.  Three files will be extracted...
    image
  2. The only file you need to worry about is IconLayOut.exe.  Copy IconLayout.exe to your c:\ (root) directory.
     image
  3. Next, create 2 shortcut icons on your desktop.  One to save your current icons settings.  The other to restore your previously saved icons settings.
    To create a shortcut, right click on your Windows Desktop and Select New > Shortcut.
    The two shortcuts should have these properties;
    1 - Location: c:\iconlayout.exe -s
    1 - Name: Save Icon Layout
    2 - Location: c:\iconlayout.exe -r
    2 - Name: Restore Icon Layout
  4. To save the layout of your Desktop icons, click the Save Icon Layout shortcut.  To restore a previously saved icon layout, click the Restore Icon Layout shortcut.

I put the Save/Restore Icon Layout shortcuts on the bottom left corner of my desktop.

image

That's it!

Following are a few more tips and tricks to using IconLayout.

  • To restore your icon layout after each reboot, copy the Restore Icon Layout shortcut to your Windows Startup folder.
  • When you save your icon layout, it is copied to a file called c:\user-name@machine-name@screen-resolution.txt.  To be safe, make a backup copy of this file.  A backup has saved me many times!
  • To play with different icon sizes, run c:\iconlayout.exe without any parameters.  Be sure to make a backup of the previous .txt file I mentioned above.

I hope you find this little freeware utility as handy as I do.

Saturday, January 3, 2009

Desktop Wallpaper Hack

Windows Desktop Hacks - Part 1 - The Desktop Wallpaper Hack.  This is by far one of the cooler tips.  It starts with an free program called John's Background Switcher.  What an awesome name!  John's Background Switcher does exactly what the name implies.  It switches the background of your Windows desktop.

My favorite features of John's Background Switcher are;

  • It changes the background on any schedule you wish.  Once a day, once an hour, one a week.  The time is up to you.
  • It will change the background to any one of a million pictures available on the web.  Your pictures, pictures from photo-sharing sites like Flikr or Picasa, picture from your Facebook page.  You can configure the heck out of where it finds images, or you can keep it simple (I opt for simple). 
  • If you don't like the picture it chooses, John's Background Switcher is always sitting in your window system tray, awaiting your command.  A simple double click on John's Background Switcher and a new picture will be randomly selected.

image 

The installation is breeze.  Simply download the installer from John's Blog.

You will never get bored of your Windows background wallpaper again!

Friday, January 2, 2009

Windows Desktop Hacks

Recently, Lifehacker published an article titled Most Popular Desktops of 2008.  Basically, it was all about Windows Desktop Hacks and Tweaks that folks have cobbled together to make their Windows desktops more efficient and aesthetically pleasing.

While I didn't find one set of packaged desktop customizations to my liking, I did find a number of cool tools and tweaks to trick-out a Windows desktop that works best for me.  Over the next few days, I'll detail a number of the apps that I am using to hack my desktop.

First, here is my what my desktop currently looks like;

image

There are a few functional and aesthetic things that stand out for me -

  • The nice wallpaper.  If you spend most of your day working on your computer, it might just as well be something you enjoy looking at.  For me, I am using an applications called John's Background Switcher.  The program will search a number of photo sharing sites (flickr, Picassa, etc) and randomly pick a new background for you on a periodic basis.  I'll talk more about this program in a future post.
  • The small, organized icons.  If you are like me, you hate clutter.  A clean, organized and consistent desktop is a must for me.  I say "consistent" in that Windows is notorious for moving your desktop icons around when you reboot, change screen resolutions or just about anytime you don't want it to.  I hate that about Windows.  I will show you how to overcome this Windows irritant with an application called IconLayout.

In addition, there are a number of "under the cover" changes that I will recommend to optimize your Windows startup and provide a new update to an old tweak.  ...and by the way, all of these tips and tricks are done using freeware.  You won't need to spend $ to optimize your Windows desktop!  Stay tuned...

No Turn-By-Turn Voice Navigation on my iPhone 4!

A friend of mine gave me a ride home recently.   We were not sure how to get from Point A to Point B so he fired up his iPhone 4S Maps App...